Smudge sticks are tightly bound bundles of dried woody, resinous herbs, that are slowly burned as a way to purify and cleanse the air. While the roots of burning a smudge stick, or smudging, is in North American Native purification rites and ceremony, they can be used by anyone to bring the woody smell of the outdoors inside.
If you have a garden, chances are good that you have enough ingredients to make at least one smudge stick. The traditional and most popular herbs used in smudging ceremonies are white sage (Salvia apiana), Cedar (Thuja), Sweetgrass (Hierochloe odorata), sagebrush (Artemisia californica), and mugwort (Artemisia vulgaris). However, in my travels I have noticed that the smudging sticks available vary by region and there seems to be a lot of opportunity to branch out (so to speak) with other woody, resinous herbs including, but not limited to:
Thyme (Thymus vulgaris), lavender, yarrow, juniper, pine, mullein (Verbascum thapsus), rosemary, lemon balm (Melissa officinalis), mint (Mentha), Bee Balm (Monarda), and catnip (Nepeta cataria) to name a few.

From Left to Right: white sage; cedar and white sage; cedar, white sage, and lavender; white sage; lavender and white sage; white sage bound with two different threads; cedar, white sage, and a very woody and resinous, heady orange-scented thyme (Thymus vulgaris ‘Orange Balsam’); pine and ‘Orange Balsam’ thyme. Top: Lavender (Lavandula angustifolia ‘Hidcote’). I used two varieties of lavender here, but I can’t recall the name of the other.
On Growing White Sage in a Cold Climate: The other day I harvested a large white sage (Salvia apiana) plant that I have been growing in my garden’s sandy, dry bed. This plant is on the cusp of hardy in my area (I am in zone 5-5bish and its hardiness begins at zone 6), but this year I decided to free it from life in a pot to see how it did in the ground. Unlike the specimens I saw growing wild in Northern Mexico, my plant grew gigantic leaves, most likely the result of the wet season we’ve had. Still, it has a very strong, medicinal odour typical of the plant. I’ve left enough in that soil that should we have a mild winter, it just might live through to the next season.
When Choosing and Harvesting Herbs: Please be careful as some herbs — even the culinary types — don’t lend themselves well to burning and can be toxic or set off dangerous allergic or asthmatic reactions in some people. I have often seen common garden sage (Salvia officinalis) used to make smudges. Years ago I tried to burn some and did not like the smell. I have since read that this is not a safe herb to burn despite its safety in a host of other applications. When in doubt, burn a very small amount outdoors, in order to test the smell and indicate whether you might have a problem with a particular herb. I also have a dangerously strong negative reaction to yarrow, so again, please use caution with this herb.
Harvest herbs on a sunny and dry day. Moist herbs will grow mouldy inside the bundle where there is very little air. Pick herbs on the day you plan to use them; resinous herbs tend to dry very quickly and are nearly impossible to wrap tightly once dry. A final note that when harvesting from the wild please leave enough plant behind that it may live on happily and healthfully. Use a sharp knife or clippers to cut stems and never dig up the root.
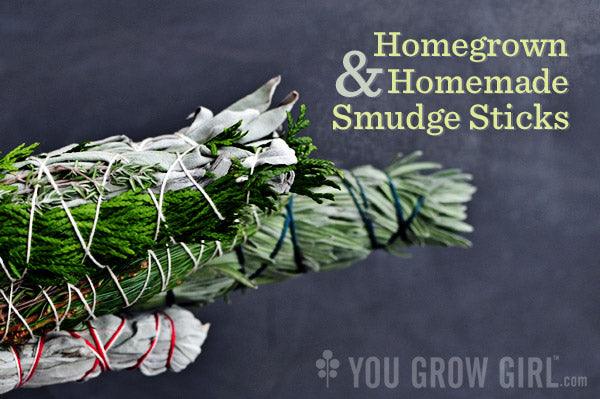
Choosing String: Remember that anything you use to bind the bundle will eventually burn so it is advisable to stick with natural materials that will not give off a toxic fume or compete with the smudge smells. I try to use as little string as possible to avoid creating a strong burning string smell. I suggest using thin, organic cotton string when you can. Embroidery floss separated into 4 threads (they typically come as 6 threads) is strong enough. Use a single color of string or experiment by mixing colors. I like using a simple color to bind and a subtle colour that compliments the foliage to make the handle. Red is a common colour for ceremonial usage, which is why you will see many commercially sold bundles bound with it.
HOW TO BIND AN HERBAL SMUDGE STICK

The key to making a successful smudge stick is in binding tightly. I liken it to cigar making in that a tight bundle of leaves burns more slowly. I also find that the plant materials shrink as they dry and a loosely tied bundle is more likely to lose bits and pieces along the way or fall apart completely. With that in mind, grasp plants firmly and give the string a tight yank each time you turn or tie.
- Step 1. Clip herbs into similarly sized lengths. Don’t skimp out — thick bundles smoulder slowly and are better looking. Pluck off any diseased or ugly leaves. Arrange the stems into a bundle and tie a tight knot around the stem end to secure. Wrap the string around the stems a few more times and then tie another knot to secure.
- Step 2. Grasp the bundle with one hand and begin winding the string on an angle up to the tip of the bundle. Try to use as little string as possible and pull tightly as you go. I find that large-leaved herbs don’t need much binding, while very thin leaved herbs, especially conifers require more winding to prevent the leaves from falling out. You can leave the foliage loose at the end or fold under to keep everything tight.
- Step 3. Turn the bundle around and begin winding down back to the start, creating a criss cross pattern overtop the first strings.
- Step 4. You can choose now to either go back up and down again, retracing the path you took with another layer of string, or you can bind off and complete. I find that the pass tends to create a tighter bundle and is a good way to pull in and secure any pieces that got away the first time around. Wind plenty of string around the base of the bundle to create a handle. You can use as much string as you want here since this part will not burn. Tie off and clip any loose strings to create a neat and finished look.
- Step 5. Set the bundles aside somewhere dry and dark where there is good air circulation. You can hang them using thin wires or Holiday tree ornament hooks wedged underneath the handles. You can also lay them out flat to dry, but here I suggest setting them on top of a screen or very loosely woven basket that is raised up off of any solid surfaces so that air can flow underneath and around the bundles.
Wait until your bundles are completely dry (this usually takes a few weeks at least) before burning them.
HOW TO USE A SMUDGE STICK
Holding the “handle” of your smudge stick, light the end (a candle works best), being careful to avoid flyaway ends and falling embers or particularly combustable herbs. Hold the burning end over a clay bowl, ashtray, or other non-flammable container at all times. Allow the stick to burn for a few seconds and when it seems like it is going, carefully, gently blow or wave it to put out the flame. Allow the stick to smoulder for a few minutes; never leave its attendance. To extinguish, smother or crush the smouldering end until it goes out. Try to avoid using this water as this can ruin the stick for further use.
Include directions for use if you plan on giving bundles as gifts.
Check out CCL's White Sage & Lavender Smudge Sticks